4 消息传递
约 478 个字 179 行代码 1 张图片 预计阅读时间 4 分钟
1 Vuex 实现数据共享
用于实现“集中式数据管理”的 Vue 插件
- 对多个组件间的 读 / 写 进行集中管理
- 适用于任意组件间通信
Vuex 不属于任何一个组件(包括 App)
Intro
工作原理
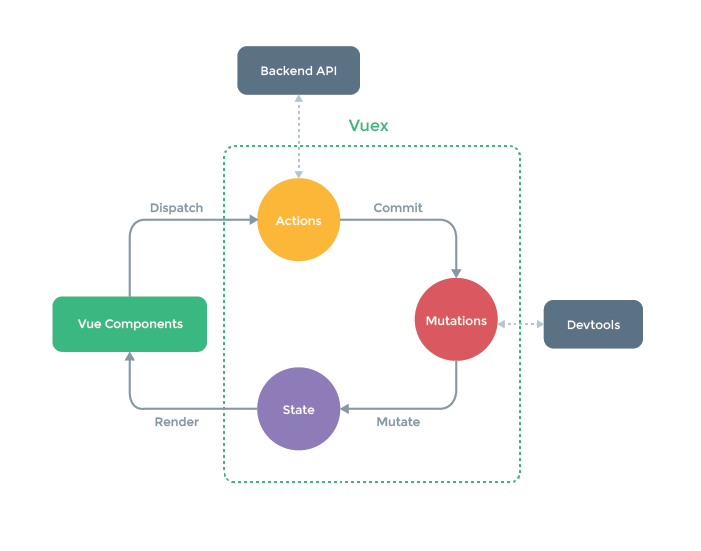
- ajax 请求由 Actions 进行发送
- Actions, Mutations, State 均受 Store 管理
搭建环境
- 安装
npm install vuex@3(Vue2 - vuex3;Vue3 - vuex4) -
使用插件
import Vuex from 'vuex'Vue.use(Vuex)并在 vm 中定义
3. 在 App 中引入 Storestore—— 定义src/store/index.js
Demo
- 把数据扔给 state
-
操作属性 - dispatch
如果 action 中没有需要判断的逻辑,可以直接在此处调用 commit
this.$store.commit('ADD', this.n)(也不用配置 action.add 了) -
配置对应的 action
在 action 中可以继续把参数 dispatch 给其他的 action 进行处理(类似于把很多个 pipe 串起来);
也可以用 ajax 向后端请求数据
import axios from 'axios' const actions = { add: function(context, val) { // 可简写为 add(){} context.commit('ADD', val) // 字母大写区分一下 // 业务逻辑一般写在 action 里:timer / 条件判断 ... // 此处可以使用 context.state.name 访问对应的值 }, addFromServer(context) { // axios 请求示例 axios.get('url').then({ res => { context.commit('ADD_FROM_SERVER', res.data) // move on }, err => { alert(err.message) } }) } } -
配置对应的 mutation
-
读取 state 中的数据
getters 配置项「可选」
需要读取加工过的 state 属性
// @ ./store/index.js
const getters = { // 用于加工 state 中的数据
    mul_10(state) {
            return state.sum*10
    }
}
// 记得塞到 vuex 的 options 中
// 可以通过 $state.getters.bigsum 进行访问
1.1 代码生成
可以采用计算属性简化插值语法中的内容:
computed: {
    sum() {
        return this.$store.state.sum // -> 直接用 {{sum}} 就行
    },
    bigsum() {
        return this.$store.getters.bigsum
    }
}
MapState & MapGetters
「代码生成」批量生成类似于上述结构的计算属性
import {mapState, mapGetters} from 'vue'
// mapState(Obj) 的生成结果是一个对象
new Vue({
    computed: {
        // 对象式写法
        ...mapState({ // 计算属性名:state分量名
            he: 'sum',
            xuexiao: 'school',
            xueke: 'subject'
        }),
        // 数组式写法 - 生成和 state 中分量同名的计算属性
        ...mapState(['sum', 'school', 'subject']),
        // getters 的生成规则同理
        ...mapGetters(['bigsum'])
    }
})
MapActions & MapMutations
methods 中存在一堆重复调用 dispatch / commit 的函数
-> 所以我们生成一下
import {mapActions, mapMutations} from 'vue'
new Vue({
    methods: {
        ...mapActions(['addAwait', 'addOdd']),
        // dispatch -> 调用时需要传参
        ...mapMutations({increase:'add', decrease:'sub'})
        // commit 生成格式如下:
        // increase(val) {this.$store.commit('add', val)}
        // 在绑定事件时就需要穿参 - @click="increase(n)"
    }
})
1.2 模块化 & namespace
把 action / mutation / state / getter 按照功能模块进行打包
在 store 中分装模块
// @ ./store/index.js
// 计算相关的配置
const countOptions = {
    namespace: true, // 否则无法在 map 中指定模块名称
    actions: {},
    mutations: {},
    state: {},
    getters: {}
}
// 人员相关的配置
const peopleOptions = {}

// 创建并暴露 store
export default new Vuex.Store({
    modules: { // 同样可以使用简写形式
        count: countOptions,
        people: peopleOptions
    }
})
修改 Map 生成代码
new Vue({
    computed: {
        ...mapState('count',['sum', 'school', 'subject']),
        ...mapState('person',['personList']) // 每个模块单独一行
        // 也可以通过 this.$store.state.count.sum 来拿到数据
    }
})
修改 commit
new Vue({
    methods: {
        ...mapMutations('count',{increase:'add', decrease:'sub'}),
        // 同样是每个模块单独一行
        neo_person() {
            const p_obj = {id:nanoid(), name:this.name}
            this.$store.commit('person/ADD_PERSON', p_obj)
            // 手动调用 - namespace/function
        }
    }
})
修改 getter
// 对于 mapGetters 的修改和上面类似
// 手动从 getters 中读取值
computed: {
    firstName() {
        return this.$store.getters['person/firstPersonName']
        // 因为 . / 冲突,此处使用下标访问
    }
}
2 全局事件总线
任意组件间通信 其实就是所有人都通过第三方进行转接
// App.js - 安装全局事件 $bus = vm
new Vue({
    beforeCreate() {
        Vue.prototype.$bus = this
    }
})

// 发信方(记得给标签绑定事件)
methods: {
    sendStuName() {
        this.$bus.$emit('hello_event', 666)
        // 触发三方的 hello 事件,携带数据 666
    }
}

// 收信方 - 回调函数定义在收信放的 methods 中
mounted() {
    this.$bus.$on('hello_event', (data) => { console.log(data) })
}
记得销毁组件时关掉 $bus 上绑定的相关事件
3 消息订阅 & 发布
实现任意组件间通信 - 此处试用
pubsub-js实现
- 安装
pubsub-js-npm install pubsub-js - 在涉及收发的组件中引入 -
import pubsub from 'pubsub-js' - 接收方订阅消息
- 发布消息
- 销毁时解绑